Saxophone tone-hole repair

tonehole2

It’s summer and I finished my differential equations class at Temple so I’m back working at Coles Music Service until school starts again.

Today I repaired a cracked tone hole on a Mark VI baritone saxophone. There are a couple of ways I could have done this job:

  • Simply thrown some nail-polish over the crack to seal it
  • filled the crack with solder
  • put a patch over the crack

I choose to patch the crack but I challenged myself to make the repair as good looking as possible within reason.

The first thing I did was grab a smashed bell that was lying around from a Custom Z tenor. I figured that the brass would be of appropriate quality and thickness if I cut a piece from one of the bell tone holes. After cutting a rough shape I used a grinding machine with an abrasive sponge type wheel (I don’t know what it’s called, I wasn’t around when the shop ordered it) to further shape the patch. Going back and forth from the tone hole needing repair to the grinder I continued to shape the patch until it sat against the tone hole and the body of the sax flush.

Next I soldered the patch to the outside of the tone-hole (never do it inside unless you are actually trying to change the diameter of the tone-hole). When it was sufficiently attached to the horn I then used a Dremel tool with a rubber abrasive wheel to remove excess solder and blend the patch as closely as possible to the tone-hole wall.

Once I buffed the tone-hole and patch to a similar surface I filled down the excess of the patch which protruded above the tone-hole and finished off using a rotary file to level the tone-hole and the new patch.

Here is the result:

tonehole

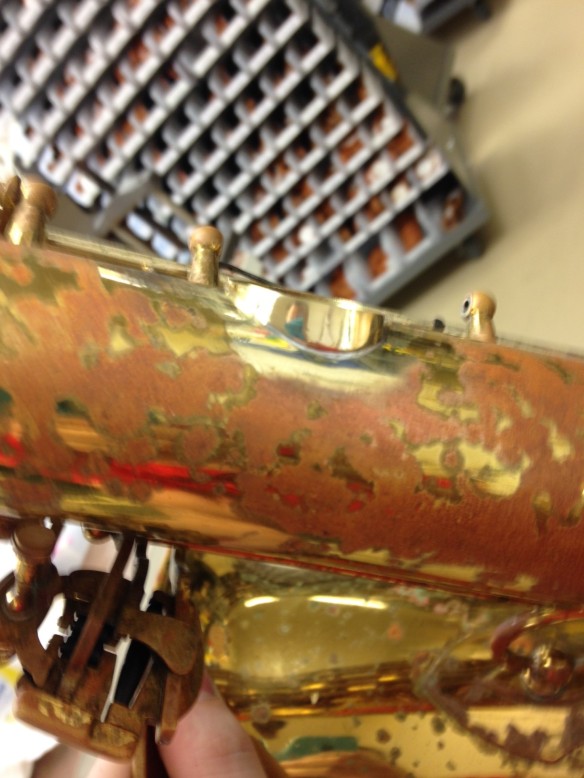
I am happy with the way this turned out. The process would have been more difficult on a horn where lacquer loss was a big concern but  I think that even in that case it is preferable to do the repair this way and take the loss of original lacquer. In most cases it wouldn’t matter anyway because when a crack like this develops, the chances of much original lacquer being left anyway is unlikely considering age and abuse taken by the horn.

Ed Coles Jr. taught me this technique and I believe it is the most sound for this kind of repair on this quality level of horn where it is well worth the effort.

Superba II bari sax


img_1280

This is a H. Couf Superba II baritone sax that I recently repaired for a school. When it came in it was really beat up: Almost all the pads were unusable, bent body, large dents, un-soldered bell brace, just a real mess. Once it was all put back together and everything was set up right and tight it played really well. These have a nice big sound, feel compact in the hands, and have decent key work. My manager Russ, at Coles Music Service in Sewell NJ where I work part time, actually has this same horn for sale currently only his is in much better shape. If you’re looking for a nice vintage horn with a lot of bang for the buck, the Superba II is a good one to check out.

Soldered Tone Holes

Most modern instruments have drawn tone holes. These are the kind you see where the tone hole is formed from the body of the instrument and there is no seam. When the body of the instrument is made it has small holes punched out of the metal. Then a specific diameter metal ball is then drawn up through the hole which widens it and forms the tone hole.

Another technique is to cut the appropriate diameter hole and then place a separate metal ring which forms the wall of the tone hole on the body of the instrument. The wall is soldered to the body of the instrument.

The advantage of soldered tone holes over drawn tone holes is their superior ability to hold their shape and not warp because of dents or over time as the metal relaxes. The disadvantage is that on very old instruments, the solder can disintegrate causing leaks.

img_1274

Pictured above is a soldered tone hole on a Conn bass saxophone I was working on. You can see a massive space has formed between the body of the instrument and the wall of the tone hole. To repair this we simply re-solder the tone hole to the body, filling in the gap.

Although the procedure is simple, usually where there is one un-soldered tone hole there are others and fixing this requires many keys to be removed. An inexperienced repair person my not notice these problems when they estimate the repair job. That’s why it is important to always estimate carefully and use a leak light.

img_1249

Farewell to my teacher Ed Coles Jr.

The man who taught me instrument repair was murdered yesterday by his own son.

Edward Coles Jr. was a world class repairman. I feel that the meticulousness and artistry of his work was unparalleled. I’ve seen lots and lots of repair work on all types and levels of horns, and if you’re lucky enough to have had Ed work on your horn, you’ll know that I’m not being hyperbolic. Ed’s passing is an enormous blow to myself, and I’m sure to his friends, surviving family, and to the Delaware Valley musical community at large.

Ed’s repair work really embodied his spirit in general. He was always open to new ways of making repairs and learning from anyone that had a good idea. A lot of big time repair people think they’re the end all, they know everything, any way but theirs is wrong. Ed wasn’t like that. I remember lots of occasions where he wanted my opinion on a repair he was making even though he taught me everything I know. When he asked me, he wasn’t just trying to make me feel good (though it did), he genuinely wanted another perspective, to get another set of eyes to see if he’d missed something. Sure, Ed knew he was talented; but he didn’t lord his abilities over anyone.

In fact, Ed was also a great educator. Besides mentoring myself, Ed has taught many other repair technicians over the years. Recently he had gotten a gig at the University of the Arts in Philadelphia teaching repair part time to music students. Ed was also an annual feature for music ed. majors at Rowan University in Glassboro where he held clinics for aspiring band teachers as well as ran a free repair both at the Jazz Festival.  If Ed had the opportunity, he would have been teaching repair full time. It’s really a shame more people didn’t get to train under him.

He was a musician and a band director as well. He directed the Bonsal blues concert and dance bands off and on for decades. I had the pleasure of playing in both bands and let me tell you, Ed really knew his stuff as a director and as a musician. He dedicated a ton of time to these bands, he truly loved being involved in music.

Ed was funny and he was generous. He always let me work on my own instruments in the shop after hours, never charged me for any parts, even did free repairs for my fiance before I had learned how to do them myself. And it wasn’t just me, he did so many favors for so many people and he never asked for anything. Lot’s of people asked for favors, believe me, lot’s of people who had no right to be asking for favors, but Ed did them anyway. Ed never burned bridges, even with people who treated him like crap.

And Ed loved his family more than anyone I think I’ve met. By all accounts he should have hated some of them for things they did to him…but he didn’t. It’s strange that I know so much about his family life, normally I don’t think bosses tell their employees as much personal stuff as he told me, but because I was privy to a lot of the comings and goings in his life when I worked with him and I knew his family pretty well, I think I really got a good sense of who he was.

The circumstances of Ed’s death are tragic for so many reasons, maybe the most tragic is that the man who killed him, his son, doesn’t understand or appreciate that his father loved him dearly. If he did he would never have done the evil that’s he’s done.  Edward Coles Jr. was a great man. I doubt I will ever meet anyone like him again. Ed was the most generous man I’ve ever know and one of the kindest. I will not forget him.

-David Horowitz


101_0788


Fixing woodwind cracks with carbon fiber banding

A relatively new way to fix cracks in woodwind bodies is carbon fiber banding.

carbon fiber

carbon fiber

The first step is to cut a channel for the fiber to lay in. I did this on the lathe.


channel

channel

Then we lay some epoxy in the cut and wrap the carbon fibers around, making sure we get them covered in lots of epoxy.


crack3

I cut off the excess fiber and let the joint sit overnight. Once it is nice and hard, I sand the excess glue and fiber down until it is even with the body. A little bit of light sanding with micro-mesh afterwards and the band is hardly noticeable. Unfortunately, I don’t have a picture of the finished product as a metal ring went over the banding so you wouldn’t be able to see it anyway.

Pad eating bugs

If one day you take your instrument out of the closet after a long time and you find that your pads are missing chunks, these guys are to blame:

padbugs

They’re a little bug that likes dark places and to eat the glue used in woodwind pads, especially flute and clarinet. If you want to avoid this problem, don’t leave your instruments in a dark place for a very long time and air the case out every now and again.

How to get a factory fresh clarinet tenon cork

Do you remember what your tenon corks looked like when your clarinet or other woodwind was brand new? Next time you have a tenon cork replaced, take a close look at the job. Does it look brand new again?

Here’s how I get my tenon corks looking fresh:

t1

First I apply the cork, taking care to cut it carefully to fit between the rails.

t2

Next I put the clarinet body into the lathe. It’s held in place by a live center which spins and one end and a bench peg in the chuck. As the lathe spins the body, I use a strip of sandpaper to cut the cork down and shape it.

t3

I check the fit with the socket of the instrument every so often and gradually get the fit I want. I don’t want to sand too far. The fit should be so about 1/4 to 1/2 of the tenon can fit into the socket dry without any cork grease.

t5

I shape the cork into a barrel shape, tapered on each end.

t4

Finally, I impregnate the cork with wax to lengthen its useful life and then apply cork grease to check the final fit. I wipe the excess off with a paper towel and q-tips.

Using this method you get a tenon cork that lasts and looks like it did when it left the factory.

Trip to the Burkart Flute factory


Image

Sorry for the bad quality, this was taken during my pre-iPhone days


I went to the Burkart Flute factory just outside of Boston a few years for a repair clinic and while the clinic itself wasn’t all that interesting, the tour of the factory defiantly was worth the trip. Burkart makes top of the line flutes with their lowest priced model starting at around $10K and their highest listed flute being close to $50K. They actually have and even more pricey model but it’s by request only. I don’t know anyone who’d spend $50,000 on a flute, but I asked one of the craftspeople how many flutes they actually sell and she told me they were backlogged a year at that point if I remember correctly.

Much of the price point is accounted for by the cost of raw materials; silver, gold, and platinum don’t exactly compare with the price of brass. Burkart had a safe full of gold and they let me hold a big piece of round silver stock that must have been about 3 pounds. Probably the most expensive thing I’ve ever had my hands on! In addition to the materials, the machines they use are very expensive as well. They had a few CNC lathes that run around half a million each as well as computerized milling machine which was very cool.

They also showed us some instrument bodies and parts they were manufacturing for other instrument makers. The owner wouldn’t tell us who they were doing work for but they had a bunch of french horn rotor assemblies as well as Oboe bodies they were making with the computerized milling machine I mentioned. That thing was amazing; once it had been programed (which was a lengthy process), it could churn out a flawless Oboe body in something like 5 minutes. The measurements were so exact that when we tested putting a rod screw through the posts, the alignment was absolutely perfect; you could drop the rod right through and it wouldn’t catch or wobble one bit.

Burkart also makes piccolos from grenadilla wood which they let season for two years before using. They told us that a big reason so many clarinets crack these days compared to times past is because the manufacturers are not waiting nearly enough time and letting the wood season properly. Apparently this is due to the shrinking numbers of the African Blackwood trees available as an increase in demand. It may be that sometime in the near future, there will be no more grenadilla instruments because of over-harvesting.

Finally, we got to see how their flutes are actually made. As you can see in the above picture, the manufacturing floor isn’t very fancy; just a big room with lots of benches and soldering torches. All the flutes made there have soldered on tone holes if memory serves and most of the parts are made from precious metals. I think it would be nerve-wracking to be soldering onto solid silver and gold body tubes all day; too much heat and you melt the thing. They told me it happened sometimes but it really wasn’t a big deal because they can just melt it down and remake it, a luxury afforded in manufacture that we defiantly do not have in the repair shop. All of the parts they use are made on site apart from pads and some screws from what I gathered. They had mini-arc welders that they used to tack the parts together before they did the silver soldering. I got to try the machine and it was very cool but I wasn’t very good at it. Oh well.

We were allowed to sort of wander around the factory floor much of the day and talk to the different people working. All of the workers do most of the different parts of the flute manufacture and rotate every so often. That seems like a good idea so people don’t get bored and when someone is out, someone else can take over a certain job if need arises. I got a chance to get my grubby fingers on some of the flute models in the show room, actually, holding those flutes might have been the most expensive things I’ve held as opposed to the silver rod, I’m not sure. Anyway, those flutes are just extraordinary: I can’t comment on the tone, I don’t play flute well enough to know, but the construction is of the absolute highest quality. Burkart uses a system called micro-Link to connect the keys to each other which is a system where there are no pins as there would be on most flutes. Visit their website to read about it because they can explain it better than I can, but generally I think the idea is to get a very tight feel with as little spring tension as possible. An added benefit would be that unlike on pinned key work, there are no pins to wear and eventually cause wobbly keys. That’s a guess on my part though so don’t quote me.

So it was a cool trip other than the fact that my junky car broke down on the way there, but that’s another boring story which I’ll spare you.

http://www.burkart.com/


Bass saxophones aplenty

2221

Being that I have the fortune (or misfortune depending on the day) of living and working right outside of Philadelphia, I’ve worked on more bass saxophones in a few years than most repair people will in a career. The Mummers are a big deal in Philadelphia and boy do they love their saxophones. The Mummers parade is on New Years day and is basically a bunch of men dressed up in feathers and sequins dancing down the street stone drunk. Somewhere in that mess are a few string bands, also drunk and dressed all fancy. These guys are a tad rough with their horns and the bass saxes the have are pretty much all in the century old category. So when they come into the shop, they are in really bad shape.

This one (the one on the chair in the picture) has soldered tone holes. Let me tell you, this sax has been a nightmare. Pretty much every tone hole has big gaps where the soldered has crumbled away between the body and the tone hole. How the horn played a single note at this point is beyond explanation. So yesterday I was going around every tone hole and filling in all the missing solder. Today I started replacing most of the pads; the horn really needs an overhaul but the band doesn’t want to shell out the cash so I was told to ‘make it play’. Thankfully I’m doing this bass at my full time job instead of at my shop so the couple of days this work is taking me isn’t on my dime. I expect to finish the job tomorrow by lunch time and I’ll be glad to be finished with this one.

So if you have a saxophone, a Martin for instance, with soldered on tone holes and you have a mysterious leak that you just can’t seem to pin down, there’s a good chance that the solder joint between the tone hole and the body has a leak somewhere. Make sure your repair checks when you bring your horn in, especially if it’s a vintage horn.

Hall of shame


badpost

Poor poor saxophone, what have they done to you?!

So here’s a Yamaha 52 Bari sax that came in from a school who had previously had work done by Music and Arts. Apparently they needed to replace a post. It looks like they just took a post off a silver horn and soldered it onto the sax without bothering to fit it whatsoever to the key or rod. This is why you don’t get repairs done by people who don’t know or don’t care about what they’re doing. A word of advice: If you need work done on your horn and you care about quality repairs, please stay away from stores that do school rentals. Now this isn’t always absolutely the case; there are some stores that rent instruments that actually have good repair departments, but generally, you’re going to run into a bunch of hacks if you go to a store that derives the majority of it’s profit from rentals. There’s nothing wrong with rental shops if you want to rent an instrument, but if you want quality repairs, go to a dedicated repair shop. Look at the picture and don’t say I didn’t warn you.