Soldered Tone Holes

Most modern instruments have drawn tone holes. These are the kind you see where the tone hole is formed from the body of the instrument and there is no seam. When the body of the instrument is made it has small holes punched out of the metal. Then a specific diameter metal ball is then drawn up through the hole which widens it and forms the tone hole.

Another technique is to cut the appropriate diameter hole and then place a separate metal ring which forms the wall of the tone hole on the body of the instrument. The wall is soldered to the body of the instrument.

The advantage of soldered tone holes over drawn tone holes is their superior ability to hold their shape and not warp because of dents or over time as the metal relaxes. The disadvantage is that on very old instruments, the solder can disintegrate causing leaks.

img_1274

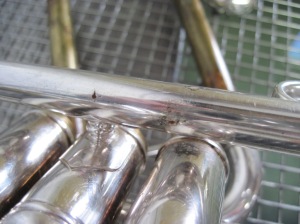
Pictured above is a soldered tone hole on a Conn bass saxophone I was working on. You can see a massive space has formed between the body of the instrument and the wall of the tone hole. To repair this we simply re-solder the tone hole to the body, filling in the gap.

Although the procedure is simple, usually where there is one un-soldered tone hole there are others and fixing this requires many keys to be removed. An inexperienced repair person my not notice these problems when they estimate the repair job. That’s why it is important to always estimate carefully and use a leak light.

img_1249

Ultrasonic cleaning and why it’s great

I love my ultrasonic cleaner. You should love it too. Here’s why:

Ultrasonic cleaning is a process where transducers, on the bottom of a tank of water and mild cleaning detergent, generate millions of microscopic cavitation bubbles with sound waves transmitted through the water. These bubbles get into every tiny space on the object you’re cleaning and gently remove the dirt.

The cleaning process is fast, safe for instrument lacquer and finish, second to none in quality, and environmentally friendly to boot. The only downside is that the machine is expensive…very expensive. But hey, that’s my problem not yours. You as a customer get all the benefits. It’s recommended that instruments, especially brass instruments, be ultrasonically cleaned and serviced once a year. This prevents build up of calcium and dirt which can rot your leadpipe and damage your valves.

I can’t say enough good things about ultrasonic cleaning.

www.davidfrostmusic.com

Patches

Sometimes you have to patch cracks on brass instruments. If I can find a new part or can make one, I will do that before I use a patch because patches are usually somewhat unsightly and amateurish looking. But if I have no choice, then I’ll make a patch…but I’ll be a little artistic about it.

For instance, in the above picture, I made a patch on the back turn of a Selmer k-modified trumpet. I cut the patch into the same diamond shape as the braces. While the patch is still obvious, it looks a little better than just throwing a regular oval patch on the crack.

The most useful patch technique I’ve used so far is making a patch that completely circles the cracked tube. If you do it carefully, you can sometimes end up with your patch looking like it was originally supposed to be there.

Can you see the patch?

How you might get an apprenticeship in band instrument repair

Do you want to work at a glamorous bench like this?

Then read on my friend!

So how do I find someone willing to teach me repair?

First, you’ll need to find someone that does repairs in your area. That’s a no-brainer right? Well, it’s easier said than done. Like I’ve said previously, there aren’t many instrument repair people in the first place… and just because a music store sells horns, doesn’t mean they fix them in house.

If you don’t know a repairman yet, go online and find one. It shouldn’t be too hard to find a repairman in your area using Google. Check out their website and you can probably find their contact info. Then all you have to do is send them an e-mail to get the ball rolling.

What do I say?

It’s a well known fact that most people enjoy talking about themselves. Repair techs are no different. Most repair people are more than willing to share information about their field with anyone who’s interested. If you send an e-mail or call (I prefer e-mail because it’s less invasive than a phone call but that’s just me), I would start by simply asking for advice on how to get into the field. You might ask if you could come into their shop and talk to them face to face about it. With the right line of questioning, you could end up getting yourself an apprenticeship but a word of warning: Don’t be pushy. (which should be obvious if you have any people skills)

I met my boss at a jazz festival my university holds every year. All the local high school jazz bands come to play and be taught by the college professors. My boss set up a table where he was doing free repairs on the kids instruments at the festival. (a great PR/advertising strategy). I had already found out some information about repair online and I was actually planning to visit a repair school in a few weeks but I figured that the more advice I could get, the better. I went up to the repair table and started talking. We chatted for a bit about repair and what it was all about. He even offered to let me come to his shop and mess around a little with my own instrument if I wanted using his tools. I told him that would be great and thanked him and left. When I got back to my dorm later that day, I wrote an e-mail to him thanking him again for his time and my interest in taking up his offer to see his shop. It wasn’t until I had already come back from visiting the repair school out west that I received an e-mail from him. In it, he invited me to have lunch with him to discuss repair and the possibility of an apprenticeship. That’s how I got into the repair business.

I’m sure your experiences will vary. You have to do a lot of this people stuff by feel and it’s hard to give advice without being in a situation myself. I was lucky! I happened upon someone who was willing to teach me repair. But it isn’t all dependent on luck.

The way I approached the situation was probably more responsible for getting the apprenticeship than luck. Being respectful and genuinely interested in someone is key. Too many people today think things are owed to them. They think they’re special and go around expecting everyone to give them something without giving anything in return. Don’t be like those people, especially if you’re trying to get someones help.

Well, that’s my rant for the day. See you next time. Oh, and if you have any questions, feel free to ask me!

So you want to be a repair man?

There seems to be a fair amount of interest in learning band instrument repair among musicians. Especially with saxophonists…not sure why; maybe because their horns are more mechanically complex than other horns? Anyway, if you happen to be interested in learning the band instrument repair trade, this post is for you!
There are two ways to get into the band instrument repair trade: Going to a repair school or apprenticing. A combination of both is also a possibility.

Repair Schools

If you went to a repair school you would be taught the basics of each instrument. You’ll learn how to do re-pads and adjustments on woodwinds and you’d learn dent work on brass instruments. Those are the fundamentals of repair and the majority of the work you’ll do in an all around shop. Some schools may delve slightly deeper into repair; possibly doing finish work, making parts, or other things.

Repair school programs are no longer than two years and the time you spend actually learning repair varies between schools. Badger State Repair, run by Ed Strege in Wisconsin, is a 9 month program that consists entirely of hands on repair training. At the other schools you have to complete a normal associates degree program that includes math, English, and anything else a normal community college would require you to do to graduate.

When you leave the repair schools, the knowledge you have should be sufficient to get you hired at least somewhere, probably the big chain stores like Sam Ash or Music and Arts. However, without more training and on the job experience, you will be severely limited as a repair tech.

I believe the main reason many people choose repair school is because it is the only option to get started in the trade. Apprenticeships, especially with good repairmen, are extremely hard to come by for a few reasons I’ll explain later. If you can’t get an apprenticeship, then repair school is really your only option.

Repair school information can be found here:

http://www.napbirt.org/mc/page.do?sitePageId=57220&orgId=napbirt

Apprenticing

The other option is being trained by a senior tech in an apprenticeship. In this situation, you would work in a shop under the supervision of a repairman while you learn. Unlike many unionized trades, the band repair business has no set rules or regulations concerning training. This means that whatever you learn, if you get paid, how much you get paid, etc. is entirely up to your boss.

There are a lot of benefits of apprenticing that the repair schools can not offer. For one thing, you actually get to do real work. Whether the horn be a rental or a customers, you are working on an instrument someone will be playing at some point. I think that is a nice morale booster to be able to say, ‘I worked on that horn and someone is playing it now’. When you know someone needs that horn to work, you make sure you do a good job. If it was just some classroom example, who cares if it works or not? No one will ever play it anyway.

Cost is also big factor in learning the trade. To attend the repair program at Badger State Repair it costs $16,000 at last check. That doesn’t include anything other than some basic tools and the actual training; no lodging, no food, no nothing. I don’t know the specifics about the other schools, but assume they are comparable to other community college tuition rates + the cost of your tools. In the cost category, an apprenticeship wins hands down because it’s free and you might even be paid a little while doing it if you’re lucky.

The most important thing about an apprenticeship is that you will be trained one on one. If you find a great repairman to teach you, you can learn much more than any school could teach you in the same period of time. If you’re ready to move onto a new topic, you can because you won’t be held back by classmates who aren’t there yet. Conversely, if you need more time on something, you won’t be rushed. This way, you will learn what you need to and not miss things that you might with a schools schedule.

There’s one major obstacle inherent in training in an apprenticeship: Getting an apprenticeship. Instrument repair technicians are not like car repair technicians; there aren’t thousands and thousands of them, there’s maybe 3-4,000 instrument repairmen on Earth. (you’d think I’d be paid more) And out of those, there are few and far between that are actually worth learning from.

Even if you do find a good repairman, he has to be willing to take on an apprentice! Good repair techs are busy. If they take an apprentice, they lose time repairing and that means lost money. If you turn out to be a good repairman, it’s worth the time for them because now they have a skilled employee they know can do the work to their standards of quality.

Just a closing

Now you should have a fairly good idea about the ways people get started in the band instrument repair trade. As you can probably discern, I’m a big proponent of apprenticeships and not so enthusiastic about the repair schools. I was trained in an apprenticeship but I’ve visited a repair school and have met techs trained in repair schools. In my experience, the apprenticeship is the way to go if you can find one. My next post will talk about ways to find those elusive apprenticeships. If you’re interested, come on back to The Horn Kicker and read it then.


Red rot looks like this

Here’s some red rot on the leadpipe of a Bach Stradivarius trumpet:

Bach trumpets are great horns, the standard, but they are known for their rotting lead pipes. If you clean your horn regularly you won’t have a problem but if you don’t, well, you get what you see in those two pictures. Once it starts, the lead pipe is finished and you need to replace it. You can have it patched, and it might last for a while, but you’ll have to bite the bullet in the end.

Dent work

How do you get this…

…to this ?

You call me! But how do we repair people do that?

The simple answer: We push the horn back into shape using a bunch of different metal sticks. It’s not rocket science, it just takes the right tools and enough experience to know when to do what. Don’t get me wrong, it’s not easy…and there are some great repairmen who can take it to something close to an art; but let me fill you in a bit about removing dents.

The most common dent any type of horn gets is the bell dent: Saxophones, trumpets, tubas, trombones, french horns, anything with a bell will probably be dented at some point.

If the bell dent is easily accessible we’ll probably only have to use a mandrel (tappered metal rod) and a roller (metal tube on a stick the rolls on ball bearings). These two tools, as well as most other dent tools, are held in a vise while we push and pull the horn over them until the metal is where we want it.

votaw tool dent roller

I won’t describe all the processes involved in removing dents because it’s tedious and if you aren’t a professional repair tech, I don’t advise trying unless you aren’t worried about destroying your horn. There isn’t much information about dent work out there, probably because you’d never be able to adequately write directions to successfully remove a dent. Dent work is something you have to be taught in person and a lot of it is trail and error; it reminds me of learning to draw.


Make your own valve button pearls

Ever have a pearl fall off your horn? Did you lose it? Well there’s an easy way to make your own replacement pearls! All you need is some 5 minute epoxy and powdered pearl material. We get our pearl powder from Badger State Repair but you can use stuff that’s available at your local craft supply store.

You can use stuff like this:

http://www.rangerink.com/products/prod_perfectpearls_kits.htm

or this

http://www.target.com/p/Pearl-Ex-12-Color-Powder-Pigment-Set-Series-3/-/A-10730458?ref=tgt_adv_XSG10001&AFID=Google_PLA_df&LNM=|10730458&CPNG=toys&ci_sku=10730458&ci_gpa=pla&ci_kw=

Any kind of powder pigment color will probably work but you should test it out first. Just mix up the epoxy and add the pearl powder until you have a consistency you like. Then using a q-tip with the tip cut off, put enough of the mixture into the spot for the pearl to fill it. Wipe off any excess that may have gotten onto the outside of the pearl holder and let it cure. After about an hour, you should have a new pearl! If you want a concave pearl, just put a piece of wax paper over the mixture while it’s still curing and place a marble or bearing on top to form the concave shape.

Unsticking stuck slides

If you take care of your brass instruments, you’ll never have a stuck tuning slide. Unfortunately, there are a lot of musicians who aren’t exactly proactive when it comes to caring for their instruments. That being the case, naturally I end up working on a lot of horns with stuck tuning slides. Here’s how I get them out:

First I have to assess the particular slide situation. If the slide is out far enough, I can usually get a slide pulling tool against the ferrule and slowly tap it out, carefully alternating the sides of the slide I’m tapping so it comes out evenly.

If the slide is all the way in, I take a rag or piece of leather and stick it in the crook along with a broad edged screwdriver and tap the screwdriver with my hammer until it frees the slide up.

Sometimes, neither of these methods works. :-(. Now I have to resort to a more clever method:

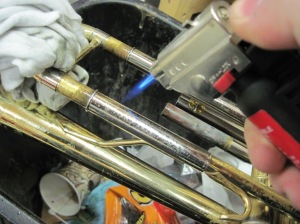
I’ll first warm up the slide with my torch, taking care not to unsolder any nearby joints or braces. Once the slide is nice and hot, I spray some PB Blaster onto the point where the inner and outer slides meet. If I got the slide hot enough, the heat will draw the oil into the space between the tubing.

After repeating this a few times, I try to tap the slide out again using the same method as before. If that fails, I heat and oil again. Eventually, the slide will start moving and I’ll be able to pull it out.

The key to the whole operation is patience! If you try and do it to fast, you’ll use too much force and make dents, bend things, or break solder joints. Trust me, I lost my patience one too many times and kicked myself later.

Which valve oil???

To keep our piston valve brass instruments running smoothly we need to always have valve oil on hand. But which valve oil is the best? This is a largely subjective area (many things in music are) and everyone will swear by different products. I figure I’ll give my two cents on the topic…

The ideal valve oil would be long lasting, cheap, and effective. Can any of them meet these criteria? You have to also consider that every brand of horn has different valves; the tolerances between the valve and the valve casings vary from brand to brand and model to model. That means that one oil may work slightly better or worse depending on which horn you’re using it in.

The standby valve oil that you’re most likely to encounter is good ol’ Al Cass. It was the first valve oil I used when I started playing and it’s what all the other kids used too. For those bundyish horns, Al Cass is a great oil. It’s inexpensive and effective on horns with a moderate to large amount of tolerance between the valve casing wall and the valve. It’s good for the youngsters because they tend to dump buckets of oil into the valves and because it’s cheap, there’s no harm in letting that oil flow.

After I went through my Al Cass phase, I was looking for something with a bit more performance. The next oil I got into using was Blue Juice. More on the expensive side, Blue Juice gave me smoother action. At this point I was using a Bach Stradivarius and at first I liked this oil…but that changed pretty fast. I found two major problems: First, the oil smelled particularly bad (my teacher commented on the smell as well as peers), second, when I went to clean out my horn, the valves had developed blue flakes all inside the valve ports. Blue Juice also seemed to evaporate kind of fast. It was time to move onto something else.

Then one day the clouds parted and down from the heavens descended a bottle of Hetmans! Ok, maybe it didn’t happen exactly that way but it might as well have. Hetmans comes in three varieties for trumpets (not to mention the various other lubricants they sell for brass): Classic, Piston, and Light Piston. Developed by a New Jersey chemist, Hetmans is the best oil I’ve come across and it isn’t likely to be beat. I really can’t find any flaws with this brand other than it’s slightly more expensive than the others. However, it is well worth it. Hetmans lasts a long time after you apply it so you don’t need to use much of the stuff and it provides the fastest and most consistent action in every trumpet I’ve used it in. The three types are very useful as well: For your average trumpet with average tollerances, use the Piston variety. In high tolerance valves that are prone to sticking, use the Light Piston. If you happen to have a vintage horn that may be getting close to needing it’s valves redone, then you can try the Classic Piston which does a good job taking up the wide valve clearance and smoothing out worn plating spots.

So there you have it! You’ll have your own preferences when it comes to oils but these three brands are the standards. Personally, I stay away from the Blue Juice; there’s just too many negatives for my tastes. Actually, I prefer the Al Cass over Blue Juice. But I think, hands down, Hetmans is the top of the line.

But there’s only one sure way to find your favorite oil…try them yourself!